January 28, 2010

The Long And Short Of It


I love to leisurely putz around my kitchen on the weekends. We make huge breakfasts that we don't serve until almost lunch time, we bake cookies, and we eat dinners that take 1 1/2 to 2 hours to prepare. It's fun to do that sometimes.

On weeknights however, I often find myself rushing around trying to throw together a healthful and appealing meal, before kiddie bath time, stories, and bed. In the last few years many of my glacial recipes have mutated into what I call "mommy recipes." These are meals that I've found short cuts to reduce the prep and cooking time. Often these are the recipes I teach in cooking class because I realize not all the ladies like to spend all day in the kitchen as I do.

Here are a few ideas to save time:

Have your butcher prep your meat while your shopping--that IS their job, you know. They will do just about whatever you ask...take the bone out of chicken breasts, but leave the skin on, remove fat, butterfly your fish, slice meat to your desired thickness, even chop a roast into stew chunks for you!

Make sauces in large batches and freeze for later, OR buy good quality jarred sauces.

Prep your veggies on grocery day before you put them a way, OR buy pre-cut veggies.

I know time-saving items can effect the grocery bill a little. But I find myself feeling that 40 more minutes of cooking time is worth the extra $1.50 difference between a jar of good organic marinara and the ingredients it would take for me to make it. Sometimes...

Here is a recipe I occasionally make into a "mommy recipe." It is inspired by our favorite Italian restaurant in Tulsa, OK--Mary's Trattoria. It's a cozy little restaurant. With old family portraits on the walls and doilies covered with oil cloth on the tables; it reminds me of a mom and pop shop you'd find it Little Italy. The food has a very homey quality. I LOVE their version of Chicken Cacciatore...simple and hearty. When we moved, I weaseled the ingredient list out of the owner. I have played with the proportion enough now that think I've got it!

I'll try to explain both methods, long and short.


Chicken Cacciatore

Ingredients:
12 oz. thinly sliced mushrooms
4 boneless chicken breasts
¼ cup flour
3 Tb. butter
3 Tb. olive oil
4 cloves of garlic, minced
1 cup dry white wine
3 cups marinara (homemade or jarred)
1 lb. spaghetti
Fresh basil or parsley for garnish

*If you are going to make your tomato sauce from scratch, make it first. You can prep everything else while it's simmering. The recipe is below!

Heat a large pot of salted water over high heat for the pasta. Heat your largest skillet over medium-high heat. Add 1 Tb. of oil and 1 Tb. of butter to the skillet. Saute the mushrooms until they are soft and brown--10 minutes, then remove them from the skillet.

Sauteing the mushrooms first gives them a more concentrated earthy flavor and better color. But, if you are in a hurry, skip this step and throw the raw mushrooms into the sauce later!


Butterfly and separate chicken breasts.

To skip this step you can buy chicken "cutlets" at the store, which are thinner slices of chicken breast.


Salt and pepper both sides of each piece of chicken; then rub with flour.


Add 2 Tb. of butter and 2 Tb. of oil to the skillet and wait until butter is melted before adding chicken to the skillet. Saute’ chicken 1-1 ½ minutes per side; then add wine and garlic. Cook chicken in wine for another 3 minutes.


Remove chicken from skillet and tightly cover with foil to keep warm. Add the mushrooms and 3 cups of marinara to the skillet and simmer for 10 minutes—stirring regularly.


Meanwhile, add pasta to the boiling pot of water for 6-8 minutes—then strain.


Serve with the sauce over the pasta and chicken. Serves 4.


*If using jarred sauce, choose something thick, herby, and slightly sweet. Taste the sauce before adding it to determine if you need to throw in a tablespoon of sugar and 1-2 tsp. of herbs.

Basic Marinara

2 Tb. olive oil
1 medium onion, finely diced
3 cloves garlic, minced
2 tsp. dried thyme (or Italian seasoning)
½ carrot, finely grated
1 28 oz. can crushed or diced tomatoes
Salt and Pepper

In a medium sauce pan; heat olive oil over medium heat. Add onion and cook for 8-10 minutes. Add garlic, thyme and carrots and cook another 5 minutes. Add tomatoes and bring to a boil. Lower heat and cook another 20 minutes to thicken. Salt and pepper to taste. Makes 3 cups.

January 25, 2010

Here's To The South, Y'all!

All generalizations are false, including this one.
Mark Twain


As I've mentioned in a previous post, I've been living in North Carolina for almost six years now. I guess I had preconceptions about what it would be like living in the south. While planning for our move my thoughts often ran to dark images of starchy, high-nosed women bearing over-sized hats, rundown appliances and a tractor sitting in an overgrown front yard, BBQ doused with vinegar, and (typing with lightly treading fingers)...remnants of bigotry. I thought at very best, it would be like Steel Magnolias. Choosing to come with an open mind and positive attitude, I quickly discovered I was quite off base! Yes, this IS a pearl-wearing, sweet-tea-drinking, pork-loving kind of place. (Nothing against pearls or pork!) But, I quickly discovered there is an intangible charm about the south--a magical quality you don't find in most places.

I'll try to explain my findings:
(I know I'm stereo-typing, please forgive.)

People really are more hospitable and friendly in the south. They stop by your house to check on you. They offer many invites to theirs. They send thank you notes for thank you notes. And they always offer you cake--wherever you go!

In one word, Charleston. If you have never been to Charleston,South Carolina it is a MUST EXPERIENCE kind of place! The buildings and historical markers are almost incomparable in the US. Loaded with art galleries, street musicians and gourmet restaurants on every corner; it's a city you hope to get lost in!

The language here not only encompasses the alluring draw we think of, but many smile-jerking slang terms as well. Conversations are sprinkled with amusing expressions that are completely new to me. I'll list a few I've recently heard and just had to write down..."Well, that just dills my pickle!" "You know that boy is slicker than frog skin." "I'm sweatin' like a fat girl writin' a love letter!" "That's about as useful as a pogo stick in quicksand." "It's cold enough to freeze the balls off a pool table!" "You know, the sun don't shine on the same dog's tail all the time." "She’s tighter than the skin on a grape."

People still smoke in the south! Maybe it's not a high note, but a curious discovery, none-the-less. Asheville is considered something of a health utopia; yet it's unbelievable how many people smoke here! I think it has something to do with the fact that there is at least one tobacco field on EVERY country road.

Southerners are very proud of their history, culture and architecture. They are aware--and in many cases--even apologetic about their shaded past, but they know their history well and tell richly colorful stories. They seem genuinely happy to share interesting facts about their town and local heroes. And they celebrate the unique art and music culture they have cultivated.

But most of all, I have discovered the wonders of Southern Cooking! It is serious business down here. There are culinary rules steeped in tradition that must be followed! Until our move, I was unaware that cornbread MUST be baked in a cast iron skillet--and in bacon grease. Any other way will only produce a cheap imitation. Dishes like squash casserole, tomato pies, tomato jam, boiled peanuts, fried pickles, soft shell crabs, and fried green tomatoes were completely foreign to me. Now that I have been enlightened, I don't know how I could ever live without soft shell crabs or fried green tomatoes! Also, I'm almost certain I had never had grits before living here. Sure, I had eaten POLENTA plenty of times...but grits, no. And did you know that their is a difference between Cajun and creole cooking? I had no idea! They come from completely different origins.

I am forever a student of my environment, and I plan to pay close attention in class!

Sommer

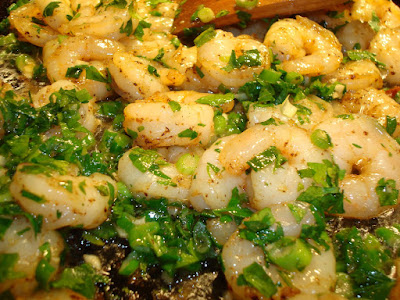
Here is a recipe I came up with shortly after moving here. We had Shrimp and Grits at a local restaurant and just had to run home and make it. Enjoy!


Shrimp and Grits

Ingredients:
1 cup stone-ground grits
3 Tb. butter
2 cups shredded fontina cheese
Cayenne pepper
1 lb. shrimp, peeled and deveined
½ lb. bacon, chopped
½ lemon, juiced
2-3 Tb. chopped parsley
1 small bunch chopped green onions (3/4 cup)
1 large garlic clove, minced
Salt and Pepper

Traditionally grits are white corn and polenta is yellow corn, but YES they are pretty much the same thing!

In a medium saucepan, bring 4 cups of water to a boil. Add grits, ¾ tsp. salt and ¼ tsp. pepper. Whisk well to avoid clumping. Reduce heat to lowest setting and cook until water is absorbed, 10-12 minutes. Remove from heat and stir in butter, cheese and 2-3 dashes of cayenne pepper. Cover until ready to serve.


Fry the bacon over medium-high heat in a large skillet. When crisp, remove bacon with a slotted spoon and place on a paper towel to drain.

About the bacon...I like to cut my bacon with kitchen sheers, it's a little easier than using a knife. Also, remove it from the pan when it has JUST turned brick red, not brown. If you are listening carefully, you'll here the sizzle change when it's ready!


Add shrimp and another dash of cayenne pepper to the bacon grease and sauté until pink—about 3 minutes. Immediately add onions, garlic, parsley and lemon juice. Toss and remove from the heat.

No need to salt the shrimp, since it's going into bacon grease.


Divide grits onto plates and top with the shrimp mixture and bacon. Serves 4.

January 24, 2010

Meal Planning Made Easy

We all have good intentions of making LOADS of healthful and tantalizing meals for our families each week. However, it's easy to get overwhelmed with work, appointments, and life's little hiccups and succumb to ordering takeout. Here are a few ideas that might help you turn over a new leaf!

• Organization is the KEY to make cooking less stressful. If you have a well stocked kitchen and preselected recipes, you are less likely to make excuses not to cook.

• Sit down with a couple cookbooks, cooking magazines, or recipes from your favorite blog the night before your grocery trip. Select several recipes for the week that vary in flavor and in cooking time. This way, you have options! You can cook what you’re in the mood for, or what you have time to cook.

• Write down your weekly “menu” including where you found the recipe and the page number. Then post it somewhere (on the fridge or inside a cabinet door.)

• Using the recipes you selected, make your grocery list, checking your cabinets to make sure you have everything you need.

• At the grocery store, get everything on your list. If you can’t find it, make a substitution or stop at another store on the way home. You’re more likely to cook your meals if you don’t have to go back to the store later!

• When putting your groceries away, wash all your produce before they go in the frigde. Let them air dry for a few minutes. Then wrap them in a paper towel to absorb excess moisture and put them in a plastic zip bag. This keeps your produce fresh and reduces prep time throughout the week.

• ALWAYS keep a “running” grocery list available in your kitchen. Every time you use a common ingredient (olive oil, butter, flour, spices) and discover it is almost gone, IMMEDIATELY write it on your grocery list. That way, you won’t forget about it later!

• When you’ve used a recipe and like it, SAVE IT! Keep a notebook, or put tabs in your cookbooks.

Here is a wonderful (and wonderfully easy) soup recipe. It has a smooth creamy texture without adding any cream. Just pureed produce! You'll feel so good about feeding it to your family you won't mind indulging them with homemade biscuits!


Butternut-Apple Soup And Savory Herb Biscuits

2 Tb. butter
1 large onion, chopped
1 Tb. curry powder
2 cloves garlic, minced
1 large butternut squash, peeled, seeded and chopped
2 large apples, peeled and chopped
4 cups chicken stock
¼+ cup apple juice
Salt and pepper
*Garnish with sour cream or diced apples

Melt the butter in a large pot over medium-high heat. Add the chopped onion and curry powder. Sauté until onions are softened—about 5 minutes. Add the garlic, squash and apples and ½ tsp. salt. Sauté another 2 minutes, then add the chicken stock. Raise the heat and bring to a boil. Cover and lower the heat to simmer for 30 minutes. Once the squash is very tender; puree the soup in a blender until smooth. (Open the vent on the lid and put a dish towel over the top of the blender. Hot soup in the blender can be dangerous!) Pour the soup back into the pot and add a little apple juice or water to thin it out. Salt and pepper to taste. Serves 4-6.


There's nothing like the light, buttery layers of a homemade biscuit! The goal is to make sure they come out of the oven as little pillows from heaven--instead of hockey pucks! I have decided I prefer to cut mine into squares with a knife; rather than the traditional method of using a round cookie cutter, then scraping the rest of the dough together to cut again. The less you mess with your dough, the lighter the biscuits (scones, shortcakes, cookies) will be. Don't adulterate your baked goods; let them rise to their full potential!

Savory Herb Biscuits

2 cups light all-purpose flour (white lily)
1 Tb. baking powder
1 tsp. salt
5 Tb. chilled unsalted butter, cut into cubes
3 Tb. vegetable shortening, cut into cubes
¾ cup milk or buttermilk
3 Tb. fresh chopped herbs (parsley, tarragon, chive, sage, thyme, rosemary)
2 Tb. Melted butter OR egg wash (1 egg + 1 Tb. Water)

Heat oven to 450* with the rack in the center. Using a food processor, pulse all the dry ingredients together. Add the butter and shortening, then pulse until it resembles course chopped nuts. Add the milk and herbs and pulse again until it forms moist clumps.


Dump the wet dough onto a well floured surface. Flour your hands and press the dough into a 6X8 inch rectangle. Using the melted butter or egg wash, brush half the dough and fold the other half over it. This “glues” the two layers together so your tops don’t pop off in the oven.


Press the dough into another 6X8 inch rectangle. Flour a sharp knife and cut the biscuits into 12- 2X2 inch biscuits. Place them on a parchment paper lined cookie sheet and brush the tops with butter or egg wash. Lightly sprinkle them with salt and bake for 10-12 minutes. Makes 12.

January 21, 2010

Waste Not

My family moved to Asheville, North Carolina almost six years ago. This quirky little mountain town is home to an intriguing mix of cultures, economic positions and interests. People here are extremely passionate about whatever it is they are into--be it higher education, hiking, mountain biking, the arts, cookery, nutritional beliefs, etc. I have found that a large majority of people I meet have STRONG opinions to share. It definitely makes conversation interesting! One thing I find that MOST people here are passionate about is conservation. The mantra "REUSE, REDUCE, RECYCLE" has been popular here for quite a long time.

Recently, more of us have started using the 3 R's in our culinary endeavors. Maybe it is the economy that had cause this sudden urge to rethink how we use our ingredients and spend our money. Maybe it's a revival of grandma and grandpa's firm traditional "waste not, want not" philosophy. Either way, I believe this can only be a good thing.

You may remember as I do, how Sunday night's Roast Beef Dinner became Monday's Beef and Noodle Casserole, then Tuesday's Beef Stew. Until recently, many of us never considered that there might be a more resourceful way of using our ingredients. We want what we want...and when we want it. I know many people who run to the grocery store 3-5 times per week, then throw out their leftovers every night! Our lives are completely about convenience. I fully understand this, after all, I have children. Most of my cooking is done while helping one with homework and shaking the other off my leg! But with just a little thought we could make wonderful meals, waste less food, and save money.

For instance, what if instead of throwing out veggie tops and peels, or herbs on the verge of going bad--you threw them into a pot of water with a couple tablespoons of salt. What would you have? Veggie stock. Add left over chicken, or chicken bones...chicken stock! I have often spent $4 for 32 oz. of organic stock when I could make quarts of it for FREE--just the carrot peels, onion roots, and leftover meat from dinner. I wouldn't even have to stand over it. Let it simmer for an hour and it's done! Strain it, put it in quart-sized zip bags, and freeze! By the way, professional chefs have ALWAYS done this. Reusing food items keeps their costs down and raises profit margins. Yesterday's special is today's Soup Du Jour!

More Ideas:

Reuse coffee that you don't drink by putting it in the fridge for an iced coffee later.

Stale bread makes great homemade stuffing, croutons, and bread pudding.

Leftover chili, soup, casserole, pasta sauce, lasagna, hamburger patties, mini meatloaves ALL can be put in the freezer for a ready-made meal next week.

You know those little nubs of cheese you will leave in your frig until they are green and fuzzy? Pop them in the food processor with a little white wine, butter, and herbs and you will have the most delicious cheese spread. Much better than those you buy in a tub for $7+.

Throw unused fresh herbs into a salad, instead of letting them die in the bottom of your produce drawer. Your will instantly have the $5 boxed herb salad mix from the grocery store.

And now an amazing culinary trick...I will turn soup into bean dip! Make a classic navy bean soup for dinner one night. Then puree the leftovers and add a little extra spice on day two. You will have the most amazing bean dip. My husband calls it bean "crack" because it's unbelievably addictive. Serve it warm with tortilla chips or cut veggies. It's a great appetizer or side dish for a latin-inspired meal.

There are so many creative and responsible things we can do in the kitchen, if we just take a little extra time to think about it. Happy Conservation Cooking!

Sommer


Homemade Cheese Spread

1/2 lb. left-over cheese (any variety), at room temperature
1/8 cup dry white wine
2 Tb. unsalted butter, softened
1 Tb. fresh parsley (or basil, thyme, rosemary...)
1/2 tsp. minced garlic

Remove any rinds from hard cheeses. Cut cheeses into 1/2-inch cubes. Place cheese, wine, butter, herbs, and garlic in a food processor and blend until smooth--2 minutes. Serve or refrigerate for at least 1 hour for a firmer consistency. This can be stored in the refrigerator for up to 1 week.

Classic Navy Beans Soup

2 Tb. oil
1 large bag of navy beans (or any white bean)
1 large onion, chopped
3 garlic cloves, minced
1 ham bone/hock (mine was in the freezer from Christmas) OR 4 oz. of chopped bacon.
1 Tb. cumin
1/2 tsp. cayenne
1/3 cup chopped parsley
1 tsp. salt

Soak your beans in a large pot over night as instructed on the package. (Dried beans are a MAJOR money saver!) Drain the beans. Then add 2 Tb. of oil to a large pot over medium-high heat. Add the onion and ham hock (or chopped bacon), saute for 3 minutes. Next add the garlic, cumin and cayenne--cook for one more minute. Add the beans back to the pot. Fill pot with enough water to cover the beans. Salt and stir. Cover the pot and allow it to simmer over low heat for 1 1/2 to 2 hours--stirring occasionally and add water if needed. Once the beans are very tender, remove the ham hock and add the parley. Taste the soup, then add salt and pepper if needed. Take 3-4 cup of bean soup out of the pot and puree them in the blender. Then return the puree to the pot for a creamier texture. Serves 8-10.

White Bean Dip, A.K.A Bean "CRACK"

Take your leftover navy bean soup and add several dashes of cayenne pepper. Using an immersion blender or a food processor; puree the rest of the soup until mostly smooth. Warm and serve with tortilla chips or fresh veggies. YUM!

January 20, 2010

Confidence In The Kitchen

For the last 2 1/2 years I have been teaching a cooking class for local ladies who either need some fresh inspiration at dinner time or have little cooking experience. I named it "Confidence In The Kitchen" because I believe confidence and determination are the keys to success in almost every area of life. You know, natural talent can only take you so far. If you don't believe in yourself and you give up easily; it really doesn't matter how talented you are. You will question yourself. You will always start and never finish.

Over the years, I have learned not to take myself too seriously, to laugh at mistakes, to trust my instincts. But above all, to NEVER GIVE UP!!! Of course, this applies to cooking. So what...you burned a few meals, you cut your finger, you started a small fire, and you added 1/2 cup SALT instead of SUGAR. That doesn't mean you'll never be a great cook! Just learn from your mistakes and move forward. Julius Caesar says it best, "Experience is the teacher of all things." Keep practicing--you'll be making meals you are proud of in no time!

As for the class...it has been an adventure for all involved! I know I have grown in many areas; and the girls have gotten a lot out of it too. They are becoming quite skilled with their knives, and are definitely growing in confidence. Many of them report they are cooking several times a week and often have hilarious kitchen stories to share. The class itself has also created a LOT of funny conversation and memories. You just never know what will happen when girls come together to cook!

Every year we have a Christmas party/class. All the girls bring a dish of their own and copies of their recipe to pass around. I teach them to prepare a meal that is elegant enough for Christmas Dinner or a formal dinner party, BUT that won't push anyone over the edge with difficulty! This year we cooked Flank Steak Medallions, Herb Risotto, and Roasted Brussel Sprouts. It was a fun finish to a great year of Confidence In The Kitchen!

Thanks Girls. I love you all!

Sommer


Stuffed Flank Steak Medallions and Creamy Herb Risotto

Ingredients:
1 ½ lb. flank steak
2 cloves garlic, finely chopped
4 Tb. olive oil, separated
8 oz. wild mushrooms, sliced thin
1 bunch fresh arugula
6 pieces of prosciutto
6 thin slices of provolone
1 tsp. paprika
Salt and Pepper
Kitchen Twine

6+ cups chicken broth
2 Tb. olive oil
1 chopped shallot
2 cups Arborio rice
½ cup+ parmesan cheese
Zest of 1 lemon
2 Tb. chopped fresh thyme
2 Tb. chopped fresh rosemary

Heat a large skillet over medium-high. Add 2 Tb. olive oil and mushrooms to the skillet and sauté until soft—about 10 minutes. Add the garlic and salt and pepper well. Sauté another 2 minutes, then remove from heat. Lay the flank steak on a work surface. Using a meat mallet, pound the steak into a 9X10 inch rectangle—1/4 inch thick. Lay the cheese over the steak, leaving a 2-3 inch area uncovered along one long edge. Next, lay the mushrooms over the cheese, followed by the prosciutto and arugula. Starting with the long edge covered with ingredients, carefully roll the flank steak. Tie the steak roll in 4 places with kitchen twine. Rub the roll with salt, pepper, paprika and flour. Preheat oven to 350*. In a large skillet heat 2 Tb. of oil over high heat. Carefully place the steak roll in skillet and sear 3-5 minutes turning to brown on all sides. Transfer the skillet to the oven and bake until cooked through and cheese is melted—40 minutes. Tent with foil and let the meat rest for 10 minutes, then carefully slice in ½ inch pieces.

Measure the chicken stock into a pitcher and heat in the microwave. Heat the oil in a large skillet to medium. Add the shallots and sauté until soft—about 4 minutes. Add the rice and sauté another 2 minutes. Pour about 1 cup of warm broth into the rice at a time, stir in well. Wait until the broth is absorbed—then repeat until broth is gone. This should take about 25 minutes. After all the broth is completely absorbed into the rice, add the lemon zest, parmesan and fresh herbs. Stir and remove from heat, adding a little more broth for extra creaminess. Serve risotto warm, topped with beef medallions and roasted brussel sprouts.

Serves 4-6.

Roasted Brussel Sprouts

Ingredients:
2 lbs. brussel sprouts, trimmed and halved
4 oz. chopped bacon
1-2 shallots, sliced
Juice of one lemon
2 Tb. melted butter
Salt and Pepper
2 dashes of crushed red pepper if desired!

Preheat oven to 425*. Cook the bacon in a skillet, then drain—reserving the bacon grease. Lay the brussel sprouts and shallots on a rimmed cookie sheet. Pour the bacon grease over them and toss with salt and pepper. Roast in the oven for about 30 minutes, stirring once or twice. Mix the lemon juice and butter together. When the sprouts are tender toss them with the bacon, butter and lemon juice.

Christmas Bonbons

A decadent treat for Christmas Eve—serve with hot chocolate or flavored coffee!

Ingredients:
1 pint ice cream, any variety
8 oz. chocolate bars (not chips!)
1 Tb. vegetable oil
*garnish if desired, crushed candy cane, chopped nut, toasted coconut…

Find 2 large baking dishes that will fit in your freezer. Cover both with wax paper and put into the freezer. (You may want to turn your freezer to the coldest setting!) Once the dishes are very cold, use a tablespoon-sized scoop to make 12-14 small ice cream balls—the rounder the better. Dip the scoop in warm water to make the balls come out easier. Place them on one of the frozen dishes and put back into the freezer until very hard—at least 20 minutes. Meanwhile, place a glass bowl over a small pot with 1 inch of water in the bottom (make sure the water doesn’t touch the bottom of the bowl). Set over medium heat. Break up the chocolate bars and place in the bowl. Stir the chocolate until mostly melted. Remove the bowl from the pot and add the oil—stir well. Once the chocolate has cooled for about 5 minutes, remove both dishes from the freezer. Working fast, insert a skewer into the first ice cream ball. Spoon the chocolate over the ice cream ball—covering it completely. Place the bonbon on the second frozen dish and remove the skewer. Fill the hole on top with chocolate. Sprinkle garnish on top if desired. QUICKLY repeat with all ice cream balls. Serve immediately OR return to freezer until ready to serve!

*You could also leave the skewer or a lollipop stick in the bonbons to make bonbon pops—extra exciting for little ones. Just dip the bottom of the bonbon in the garnish so it will be on top when they are held upright!

January 19, 2010

A Fresh Beginning

I suppose for my first posting I should explain why I have decided to blog.

I guess it's fairly prosaic to say I have a love affair with food. We all do, right? Mine started at grandma's house with classic bolognese. Simmered all day--the smell was so enticing you could hardly play in the house without being lured to the kitchen on tiptoe to stick your finger into the pot. Trust me, the lick was worth the scold!

My next memories of food-love go to the grand cookie extravaganza that my mother pulled off every December. I recall making dozens and dozens of pecan crescents, chocolate swirls, butter cookies, gingerbread men, and something truly delectable called potato chip cookies! Yes, it sound's strange, but the culmination of simple, sweet shortbread with salty, crunchy potato chips in each bite is divine! Even now, the only thing I can think of that might improve upon potato chip cookies is...potato chip cookies drizzled with chocolate!

As a teenager I had the opportunity to travel and help with mission work every summer. Ages 14-22 I traveled to China, Thailand, India 3 times, Liberia, and Cameroon. As you can imagine my eyes were truly opened to a world of culinary possibilities--among other things. The endless smells of wildly exciting open air markets. Loud chattering over the price of meat hanging from a clothesline. Baskets and baskets full of spices I had never seen or heard of. Dried fish leather, street meat on a stick, naan. Ah, naan! There's just nothing like freshly baked naan, slathered in garlic butter at an open air market! It's an experience we all should be so lucky to have.

Every summer I would keep a journal of my daily work, my interludes with new friends, and the life lessons a young girl can only learn by taking her eyes off herself and focusing them on the much greater needs of others. I also took notes on the flavorful dishes I had experienced. I didn't know it at the time, but that was my introduction to recipe writing. I would come home at the end of each summer and try to replicate some of the foods I had experienced; now-and-again with success.

Over the years cooking has become a frequent method of self-expression, my way to communicate love, and possibly my calling? One husband, two children, 2 careers, and a bundle of little revelations later; I have decided to document the lessons I've learned and the recipes that followed. I hope you enjoy them!

Sommer


MOM'S POTATO CHIP COOKIES

2 sticks unsalted butter, at room temperature + 1 Tb. for drizzle
3/4 cup sugar, separated
1 teaspoon pure vanilla extract
1 cup crushed potato chips
2 cups all-purpose flour
3 oz. chopped chocolate

Preheat the oven to 350*.

In a large bowl, cream together the 2 sticks butter, 1/2 cup of the sugar, and the vanilla. Add the potato chips and the flour and stir to combine.

Place the remaining 1/4 cup sugar in a small bowl.

Form the mixture into small balls, about 1 tablespoon each, and roll in the remaining sugar. Line a cookie sheet with parchment paper. Place the cookies 2 inches apart and press with a fork (like peanut butter cookies.)

Bake the cookies until they are light golden brown, 14-16 minutes.

Remove the parchment paper with the cookies from the sheet and cool on the counter. When cookies have cooled, melt the chocolate with 1 Tb. butter in the microwave for 30 seconds. Stir and repeat until smooth. Drizzle it over the cookies. Let the chocolate harden before serving. Makes 2 dozen.

*Note- On occasion chocolate will seize (harden up) when you try to melt it. This happens because dealing with chocolate requires tempering (raising and lowering the temperature of the chocolate) with accuracy. However, we are not worried about perfection here--we're just drizzling cookies! If your chocolate seizes, add a little more butter or even some milk. This will cause the chocolate to loosen so you can drizzle it. Later it will firm up again--not quite as hard as pure chocolate--but it will still look and taste great!